SQLite and Entity Framework 4
• CommentsI met a nice fellow at the Microsoft Code Camp in Chicago recently. He had a question about how well the Entity Framework worked with other ADO.NET providers. When I told him that I had a solution working using Entity Framework running on SQLite, he was quite interested. There are a handful of hurdles to get it all working, though.
ADO.NET Provider for SQLite
The first thing you need is an ADO.NET provider for SQLite. There’s an excellent (and free) solution available called System.Data.SQLite. This is actually an ADO.NET 2.0/3.5 provider, and also includes support for the Entity Framework.
Supporting SQLite from a .NET 4.0 Project
By default, a .NET 4.0 process will happily load a .NET 2.0-3.5 managed DLL, but will refuse to load a .NET 2.0-3.5 mixed-mode DLL. This is a problem for SQLite, since it is a .NET 2.0 mixed-mode DLL. A full description of this problem and its solution is available online, but the short answer is to set useLegacyV2RuntimeActivationPolicy to true in your app.config.
Opening Alternative Data Files
SQLite has a simple “one database per file” concept that does not exist for all ADO.NET data sources. If you need to allow your application to access user-selected database files, it’s possible to “redirect” an Entity Framework connection string to an alternative data file. The correct way to do this is to crack the Entity Framework connection string, extract the SQLite connection string, crack the SQLite connection string, replace the data file, rebuild the SQLite connection string, and finally rebuild the Entity Framework connection string:
/// <summary>
/// Redirects a SQLite Entity Framework connection string to an alternative database file, optionally encrypted with a password.
/// </summary>
/// <param name="originalConnectionString">The Visual-Studio-generated original Entity Framework connection string.</param>
/// <param name="databaseFile">The alternative database file to open.</param>
/// <param name="password">The password to use for encryption. May be <c>null</c> to indicate no password.</param>
/// <returns>A SQLite Entity Framework connection string referencing the alternative database file.</returns>
public static string RedirectedEntityFrameworkConnectionString(string originalConnectionString, string databaseFile, string password)
{
    // Parse the Entity Framework connection string.
    var connectionStringBuilder = new EntityConnectionStringBuilder(originalConnectionString);
    if (connectionStringBuilder.Provider != "System.Data.SQLite")
    {
        throw new ArgumentException("Entity Framework connection string does not use System.Data.SQLite provider.");
    }

    // Parse the underlying provider (SQLite) connection string.
    var providerConnectionStringBuilder = new SQLiteConnectionStringBuilder(connectionStringBuilder.ProviderConnectionString);

    // Redirect to the specified database file, and apply encryption.
    providerConnectionStringBuilder.DataSource = databaseFile;
    providerConnectionStringBuilder.Password = password;

    // Rebuild the Entity Framework connection string.
    connectionStringBuilder.ProviderConnectionString = providerConnectionStringBuilder.ConnectionString;
    return connectionStringBuilder.ConnectionString;
}
The redirected Entity Framework connection string may be passed to the ObjectContext-derived class constructor (e.g., the “MyEntities” class that the Entity Framework creates for you):
const string OriginalConnectionString = "..."; // (Copy out of app.config)
var connectionString = RedirectedEntityFrameworkConnectionString(OriginalConnectionString, myFileName, null);
using (var context = new MyEntities(connectionString))
{
    ...
}
The Entity Framework’s Database Connection
The Entity Framework is actually an ADO.NET data provider that is itself wrapping an ADO.NET data provider (SQLite, to be specific). Normally, the Entity Framework will open a database connection whenever it needs one; these automatically-opened connections are automatically closed when the Entity Framework is finished with it. This default behavior works well with SQL Server due to its ADO.NET provider’s connection pooling. However, it does not work well with SQLite, due to various “properties” existing on the SQLite connection itself. One example is “PRAGMA foreign_keys = ON”, which enforces foreign keys only for that SQLite database connection. If the Entity Framework opens and closes its connections at will, then SQLite PRAGMAs such as these are lost.
As a general rule, you should explicitly call “Connection.Open()” for any ObjectContext. You must also ensure that the ObjectContext is disposed, so that the database connection is cleanly closed. Once “Connection.Open()” has been called, the Entity Framework will no longer open and close its own transient connections.
using (var myEntities = new MyEntities())
{
    // Open the connection (to make it long-lived)
    myEntities.Connection.Open();

    // Apply PRAGMA directives...

    // Use Entity classes...
}
It’s often useful to get at the SQLiteConnection being used by the Entity Framework. This is available through the “EntityConnection.StoreConnection” property, as illustrated by this code sample:
var connection = (myEntities.Connection as EntityConnection).StoreConnection as SQLiteConnection;Directly Accessing the Database Using SQL
Even when using the Entity Framework, there are situations where one wishes to execute SQL commands directly against the database. PRAGMAs are one common scenario; another is updating the schema structure to the latest version.
This is possible one of two ways; once the SQLiteConnection has been acquired (see above), it’s possible to create a SQLiteCommand and execute it:
using (var command = connection.CreateCommand())
{
    command.CommandText = "PRAGMA encoding = \"UTF-8\"";
    command.ExecuteNonQuery();
}
However, there’s an even easier way of doing this: Entity Framework exposes a method named “ExecuteStoreCommand”:
myEntities.ExecuteStoreCommand("PRAGMA encoding = \"UTF-8\"");Entity Framework Transactions
The official Entity Framework documentation recommends using generic transactions (e.g., TransactionScope). This has some benefits; it can be easily promoted to a distributed transaction, etc.
However, it has a timeout scheme that is not very friendly (I mentioned this a few weeks ago). In my situation, I had to potentially spend quite a bit of time upgrading the client’s database on first run.
Fortunately, SQLiteTransaction works perfectly well with the Entity Framework. My database schema upgrade code now looks like this (referencing the SQLiteConnection from above):
using (var transaction = connection.BeginTransaction())
{
    // lots of time-consuming stuff

    transaction.Commit();
}
SQLiteTransaction does not have the same timeout restrictions that plague TransactionScope, et. al.
Reminder: You do want to use a SQLiteTransaction! The Entity Framework by default will create (and commit) a new transaction for each call to SaveChanges (or each call to ExecuteStoreCommand). This is true even if EF has a long-lived connection. By using SQLiteTransaction, you’ll avoid serious performance issues.
Defining and Enforcing Foreign Keys
First, you need to enforce foreign keys on your database connection; see the SQLite foreign keys documentation for more information. This is done simply as such:
myEntities.ExecuteStoreCommand("PRAGMA foreign_keys = ON");The next step is to actually establish the Entity Framework relationships. Some SQLite databases work just fine; the EF designer is able to understand the foreign key relationships and adds them correctly. Other SQLite databases just import the entities themselves without the relationships; I’m not sure why this is the case.
If you have a SQLite database that does not get its relationships imported, then you’ll have to define them by hand. If your entity relationships are all imported fine, then you can just skip down to the “final notes”.
Foreign Keys: 0..1 to N and 1 to N
In this type of relationship, the “parent” table has an identity, and the “child” table has its own identity and a foreign key referring to a row in the “parent” table. To establish this relationship, follow these steps:
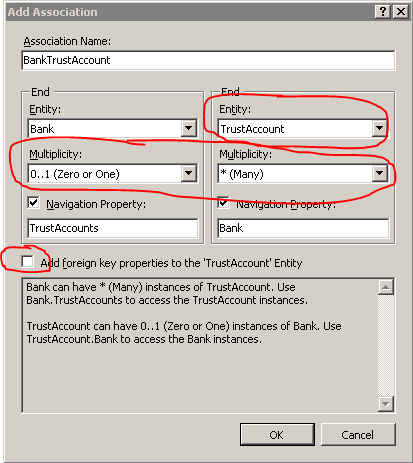
- Right-click the “parent” entity in the Entity Framework designer, open the “Add” submenu, and select “Association…”.
- Select the entity which has a foreign key pointing to this one, and ensure that the Multiplicity on both ends is correct (tip: read the plain English explanation carefully).
- Be sure to uncheck the “Add foreign key properties” option.
- Click OK. Entity Framework will create an association that you can see in the designer; however, it is not actually mapped to the correct columns yet.
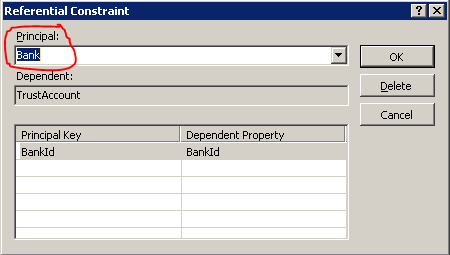
- Double-click the newly-created association (the line between the entities).
- In the “Principal” drop-down, select the “parent” entity. If your foreign key columns in the “child” entity have the same names as the primary key columns in the “parent” entity, then the rest of the dialog is filled in for you. (If not, you’ll have to select which “Dependent Property” maches each “Principal Key”).
- Click OK. The foreign key association is now completed.
Thanks to the Entity Framework Design team for their blog post on FK Associations; my instructions above are derived from that post.
Foreign Keys: M to N
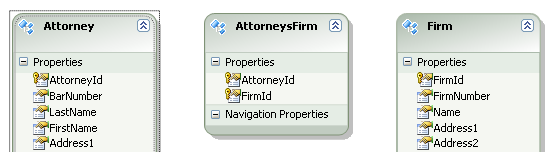
This type of relationship has a special table in the database, commonly called a “join table”. Unfortunately, the Entity Framework support for SQLite does not pick up on these relationships either, so the join table will actually be added to the Entity Framework designer as an entity.
To convert this join table entity into an M to N relationship, follow these steps:
- Right-click one of the two entities in the relationship, open the “Add” submenu, and select “Association…”.
- Select the other entity in the relationship, and change the Multiplicity so that they are both Many.
- Click OK. Entity Framework will create an association that you can see in the designer; however, it is not actually mapped to the correct table yet.
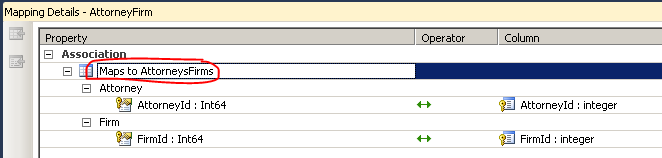
- Right-click the newly-created association (the line between the entities) and select “Table Mapping”.
- Click the
<Add a Table or View>and select the join table. If your foreign key columns in the join table have the same names as the primary key columns in the related tables, then the rest of the page is filled in for you. (If not, you’ll have to select how the columns in each table are mapped). - After the table has been mapped to the M to N association, you may delete the join table entity.
Final Notes on Foreign Key Associations
Once the entity associations are defined (as above), you may freely “update” your model from the database without losing those associations.
When using the Entity Framework with SQL Server, it is possible to detect some foreign key conflicts before they actually hit the database (e.g., a required “parent” reference). I haven’t found a way to get this working with SQLite yet, but it’s not a big deal, IMO.