Continuous Integration and Code Coverage for Open Source .NET CoreCLR Projects
• CommentsSo, I’ve been doing some more CoreCLR work, gradually porting over all my OSS projects. I just recently learned about some great tools during this process, so this post is for any other devs out there who want to start porting to CoreCLR.
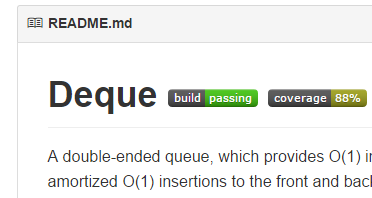
Here’s a screenshot of the first project that I converted to CoreCLR; it is hosted on GitHub, and is tied to a continuous integration system that kicks off on every checkin (the “build” and “coverage” badges show live data). The best part? All of this infrastructure support is free! :)
Unit Tests: xUnit
It seems like CoreCLR development is centering around xUnit, who were the first to push into this new platform. The actual Microsoft CoreCLR projects use a special runner for xUnit called xunit.console.netcore; unfortunately, that NuGet package has been unlisted, so it’s difficult to use for our own projects.
So, I took the approach of using a standard xUnit runner for ASP.NET projects; their web page has pretty good instructions. Just bear in mind that you must be in the same directory as the project.json for your unit test project before you can run k test.
Once you have unit tests running from the command line with a simple k test, then it’s time to move on to continuous integration.
Continuous Integration: AppVeyor
AppVeyor is one of several CI solutions who provide free builds for OSS. In addition, AppVeyor is one of the few who support VS2015 preview builds. As they describe on their blog, there’s two initial steps to enable VS2015 support: use a VS2015 CTP image, and modify your PATH so it picks up the correct msbuild version.
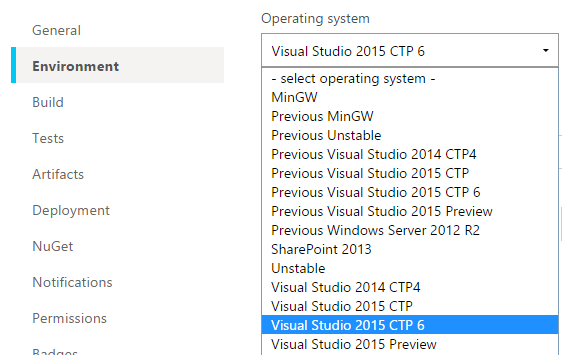
Once you’ve linked your GitHub project to AppVeyor, selecting the image is straightforward; I’m using VS2015 CTP 6 (the most recent as of this writing):
However, actually getting it to build is a bit more challenging. I currently have the following set up as a PowerShell “Install Script” for my AppVeyor build:
iex ((new-object net.webclient).DownloadString('https://raw.githubusercontent.com/aspnet/Home/master/kvminstall.ps1'))

$env:Path = "C:\Program Files (x86)\MSBuild\14.0\Bin;" + [Environment]::GetEnvironmentVariables("Machine")["Path"] + ";" + [Environment]::GetEnvironmentVariables("User")["Path"]

kvm upgrade
The first line downloads and installs KVM, just like the instructions on the ASP.NET 5 repository home page say to do. As part of that install, it modifies the PATH, so the next line refreshes that script’s path and also modifies it to pick up the correct msbuild version. Finally, kvm upgrade downloads and installs the most recent K runtimes.
There’s just one more step: we need to restore packages before building. I have the following set up as a PowerShell “Before Build Script”:
kpm restoreYou should now be able to kick off a build without errors.
Before moving on, let’s add in just a bit to get unit tests working. AppVeyor tries to do as much as possible for you using reasonable defaults, but it’s not (yet) capable of auto-detecting the xUnit .NET Core unit test project. You should be able to get unit tests running in your build by changing the test settings from Auto to Script and specifying this PowerShell script to run:
cd test/UnitTests
k test
The first line changes to the directory where my unit test project.json file is (you may need to change this if your unit test project is named differently). The second line simply executes the tests.
Code Coverage: OpenCover + Coveralls
OK, so on to code coverage! I’m using the same basic approach as the .NET Core team - that is to say, OpenCover for generating code coverage, Coveralls for publishing the code coverage publicly, and ReportGenerator for generating local code coverage reports. But my solution uses PowerShell scripts instead of MSBuild tasks.
First, you need to declare dependencies on the OpenCover, coveralls.io, and ReportGenerator packages in your unit test project. This way they’ll be picked up by kpm restore and installed on the AppVeyor build server. The project.json for my unit test project has these dependencies:
"dependencies": {
    "Nito.Collections.Deque": "",
    "xunit": "2.0.0.0-rc3-build2880",
    "xunit.runner.aspnet": "2.0.0.0-rc3-build52",
    "OpenCover": "4.5.3809-rc94",
    "coveralls.io": "1.3.2.0",
    "ReportGenerator": "2.1.4.0"
},
These dependencies should all be straightforward: Nito.Collections.Deque is the library these tests are testing, xunit and xunit.runner.aspnet are the standard packages for running xUnit on .NET Core projects, and OpenCover, coveralls.io, and ReportGenerator are for code coverage.
I recommend getting this working locally first, and then it’ll be clearer to understand why my AppVeyor test script does what it does.
First, you have to be sure to be building in the Debug configuration. I’ve had problems with OpenCover not showing coverage for optimized builds.
Second, you need to enable outputs (as in, physical disk files) for the Debug build of the library you’re testing. This checkbox is under your project settings, under the Build tab.
Third, you have to really pay attention to your directories, because OpenCover has a hard time finding PDBs for .NET Core assemblies. I believe that the K runtime is using a different form of assembly loading than the traditional .NET platform, and OpenCover doesn’t (yet) support finding PDBs in a K-runtime-compatible way. So we have to help it out a bit with PDB location.
With all that said, you should be able to execute something like the following to generate a code coverage report:
cd artifacts\bin\Nito.Collections.Deque\Debug\net45

$env:KRE_APPBASE = "../../../../../test/UnitTests"

C:\users\stephen\.k\packages\OpenCover\4.5.3809-rc94\OpenCover.Console.exe -register:user -target:"k.cmd" -targetargs:"test" -output:coverage.xml -skipautoprops -returntargetcode -filter:"+[Nito*]*"
First, I’m changing to the directory where my PDB files are for the project I’m testing (you’ll have to change to your own debug output directory, of course). Then, I’m setting the KRE_APPBASE environment variable so that the K runtime can find the project.json for my unit test project (if yours is named differently, you’ll need to change this, too).
Finally, I’m executing OpenCover with a few command line options. You’ll probably have to change the filter argument for your library; my filter is requesting coverage data only for types in namespaces that start with Nito. The target and targetargs options are telling OpenCover to execute the command k.cmd test (I found I did have to specify k.cmd and not just k for OpenCover to find the command script).
If you have all the paths (and filters) set correctly, you should see some output that looks like this:
Executing: C:\Users\stephen\.k\runtimes\kre-clr-win-x86.1.0.0-beta3\bin\k.cmd
xUnit.net ASP.NET test runner (32-bit Asp.Net 5.0)
Copyright (C) 2015 Outercurve Foundation.

Discovering: UnitTests
Discovered:  UnitTests
Starting:    UnitTests
Finished:    UnitTests

=== TEST EXECUTION SUMMARY ===
   UnitTests  Total: 88, Errors: 0, Failed: 0, Skipped: 0, Time: 2.310s
Committing...
Visited Classes 3 of 7 (42.86)
Visited Methods 59 of 70 (84.29)
Visited Points 390 of 442 (88.24)
Visited Branches 167 of 196 (85.20)

==== Alternative Results (includes all methods including those without corresponding source) ====
Alternative Visited Classes 3 of 7 (42.86)
Alternative Visited Methods 64 of 83 (77.11)
The detailed code coverage data is also written out to a local file, in this case, artifacts\bin\Nito.Collections.Deque\Debug\net45\coverage.xml. To upload this coverage data to Coveralls, first link the GitHub project to Coveralls using their dashboard. Then, copy your Repo Token and set it as an environment variable COVERALLS_REPO_TOKEN:
$env:COVERALLS_REPO_TOKEN = "Repo Token"You can now use coveralls.io to upload the code coverage data to Coveralls. The only gotcha I ran into here is that the coverall.io package runs into errors if it tries to use a hash of the source files (instead of the source files themselves), so I just pass --full-sources to force it to load the full source files:
C:\Users\stephen\.k\packages\coveralls.io\1.3.2\tools\coveralls.net.exe --opencover coverage.xml --full-sourcesIt can take a few minutes for Coveralls.io to actually process and dispaly the coverage data, but after a few browser refreshes you should see the coverage data on their website!
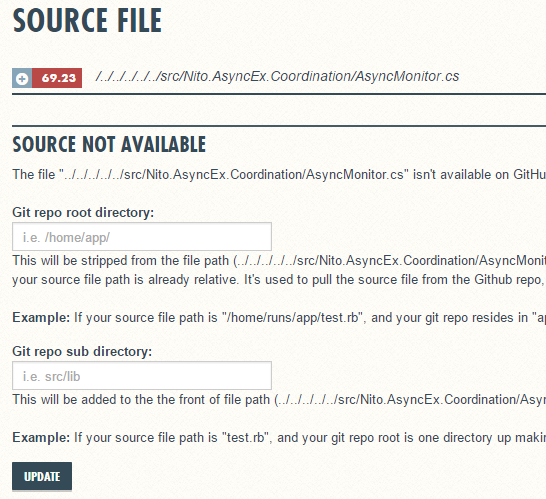
Note that if you select a specific source file, Coveralls will need a bit of help to find the matching source in the repo; you should be able to specify a value of ../../../../../ as your “Git repo root directory”:
Then it should refresh with the complete source file from GitHub, highlighted with statement coverage data:
Continuous Integration Code Coverage
OK, so let’s move all of this into AppVeyor!
First, under your Environment settings, create an environment variable called COVERALLS_REPO_TOKEN with your Repo Token from the Coveralls page for this project. Be sure to turn on encryption (the little shield icon).
Next, we can replace our existing test script with something a bit more fancy:
cd artifacts\bin\Nito.Collections.Deque\Debug\net45

$env:KRE_APPBASE = "../../../../../test/UnitTests"

iex ((Get-ChildItem ($env:USERPROFILE + '\.k\packages\OpenCover'))[0].FullName + '\OpenCover.Console.exe' + ' -register:user -target:"k.cmd" -targetargs:"test" -output:coverage.xml -skipautoprops -returntargetcode -filter:"+[Nito*]*"')

iex ((Get-ChildItem ($env:USERPROFILE + '\.k\packages\coveralls.io'))[0].FullName + '\tools\coveralls.net.exe' + ' --opencover coverage.xml --full-sources')
This is doing the same thing that we did “by hand”, but the invocations of OpenCover and Coveralls are a bit different. The only thing I’m doing here is running “whatever package is installed” instead of depending on a specific user profile location and package version. My original command line C:\users\stephen\.k\packages\OpenCover\4.5.3809-rc94\OpenCover.Console.exe would of course only work for users named stephen using version 4.5.3809-rc94 of OpenCover. The fancier (Get-ChildItem ($env:USERPROFILE + '\.k\packages\OpenCover'))[0].FullName + '\OpenCover.Console.exe' works for whoever the current user is (USERPROFILE) and whatever version of OpenCover is installed (it does, however, assume there is only one version installed - it just grabs the first one it finds).
Now you should be able to kick off a new AppVeyor build, and within a few minutes, see the code coverage results automatically in Coveralls.io!
Badger, Badger, Badger, Badger
This is a good point to add some fancy badges to our GitHub readme. The OSS community has more-or-less standardized on shields.io for consistent, scalable, nice-looking badges. Shields.io supports a number of “badge providers”, including AppVeyor and Coveralls.
Their webpage is not the most intuitive, IMO, but it wasn’t too hard to get working. The URL for my AppVeyor build is https://img.shields.io/appveyor/ci/StephenCleary/Deque.svg - that is, telling the shields.io service to use the AppVeyor CI badge provider for my (GitHub) username and project. The URL for Coveralls is similar: https://img.shields.io/coveralls/StephenCleary/Deque.svg - in this case, telling the shields.io service to use the Coveralls provider for my (GitHub) username and project.
I did notice several problems with the badges when I was first getting this working. For example, if there’s an AppVeyor build in progress (i.e., if you just modified your Readme.md), then the badges tend to time out. Just be patient and wait a bit, and then see if they start working again.
Better Code Coverage Reports
There’s one big problem with Coveralls that not a lot of people have brought to the front: it only supports line coverage, which is the weakest (and most misleading) form of code coverage. As of this writing, this is basically a limitation of the Coveralls.io service itself.
In particular, OpenCover is generating branch coverage as well as statement coverage, but all that branch coverage data (and part of that statement coverage data) is thrown away when the data is uploaded to Coveralls. I was unable to find a Coveralls alternative that supports .NET, understands branch coverage, and is free for OSS. Maybe someday…
In the meantime, you really do want better coverage information than you can get from Coveralls. Don’t get me wrong - Coveralls is great for integrating with your build process and updating badges, but it’s not actually a good measurement of test coverage.
Enter ReportGenerator. You may have noticed earlier on that we installed that NuGet package, but never actually used it. Well, now we’re going to use it. :)
ReportGenerator takes the output from OpenCover (that same coverage.xml file) and generates reports with the full code coverage information. I added a Coverage.ps1 script to my solution that does almost the same thing as the AppVeyor test script, except it generates a local report instead of uploading to Coveralls:
pushd

cd artifacts\bin\Nito.Collections.Deque\Debug\net45

$env:KRE_APPBASE = "../../../../../test/UnitTests"

iex ((Get-ChildItem ($env:USERPROFILE + '\.k\packages\OpenCover'))[0].FullName + '\OpenCover.Console.exe' + ' -register:user -target:"k.cmd" -targetargs:"test" -output:coverage.xml -skipautoprops -returntargetcode -filter:"+[Nito*]*"')

iex ((Get-ChildItem ($env:USERPROFILE + '\.k\packages\ReportGenerator'))[0].FullName + '\ReportGenerator.exe -reports:coverage.xml -targetdir:.')

./index.htm

popd
It should be pretty straightforward by this point, with the added twist that I push the current directory at the beginning and pop it at the end. I change into the directory where the PDBs are, set KRE_APPBASE so the K runtime can find my project.json, run the tests with code coverage, generate HTML reports using ReportGenerator, and open up the resulting reports. This script was designed to be run from the Package Manager Console within Visual Studio, so it’s easy to use.
There is just one gotcha with this script as-is: it just grabs the first version of OpenCover and ReportGenerator that it finds. So, when these packages release newer versions, you’ll want to delete the old versions from your development machine.
Final Notes
I don’t actually do continuous deployment with AppVeyor. If you want to, I’m sure it would not be too difficult to get working. Right now, though, nothing supports reading/writing versions in project.json, so keeping the versioning correct would be a bit awkward. Even more scripting, and (for me) it’s not worth it.
My current workflow is to use AppVeyor for continuous builds and tests, and for publishing unit test coverage data (such as it is). I still build locally (actually on an Azure VM) when I want to deploy or have a better picture of my actual unit test coverage data with a local coverage report.


