React/Redux TodoMVC, Part 4: Debugging
• CommentsThe debugging support available for React and Redux is amazing! When you do make mistakes in your app, React will give you helpful console error messages.
In fact, when we converted the HTML to JSX, React started giving us errors in the console:

Take a moment and actually read those error messages! Those are nice and detailed, telling you exactly what you did wrong, what the effect will be, how to fix it, and where to fix it! We’ll fix those errors when we make those controls into actual React components; until then, they’ll just be read-only, as the warning states.
Redux goes even further with its own kind of debugging view, which we’ll add today. This thing looks simple but is just mindblowing in its power (and I was so late in adding this to DotNetApis!). We’ll be adding this dark box on the right:
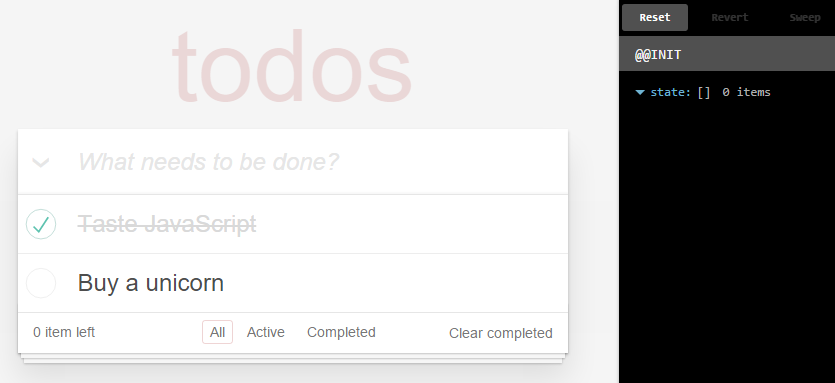
It’s called Redux DevTools, and not only does it display a history of all your actions and application state, but it also lets you rewind history and pretend actions never happened!
Creating DevTools
Interestingly enough, the first step in incorporating Redux DevTools is to create the monitors that we want to use to display them.
For our system, we’ll use the semi-standard LogMonitor-within-DockMonitor approach, in a new devTools.jsx file:
import React from 'react';
import { createDevTools } from 'redux-devtools';
import LogMonitor from 'redux-devtools-log-monitor';
import DockMonitor from 'redux-devtools-dock-monitor';

export default createDevTools(
    <DockMonitor toggleVisibilityKey="ctrl-h" changePositionKey="ctrl-j" defaultSize={0.2}>
        <LogMonitor theme="bright" />
    </DockMonitor>
);
Pretty straightforward: we take a LogMonitor, wrapped in a DockMonitor, and pass that to the createDevTools method from redux-devtools.
Using DevTools
We also have to include this new DevTools component in our application, which we can do right in main.jsx:
window.onload = () => {
    const root = (
        <Provider store={store}>
            <div>
                <Main/>
                <DevTools/>
            </div>
        </Provider>
    );
    render(root, document.getElementById('app'));
}
Note that we had to put an extra <div> wrapper around our Main and DevTools components. This is because Provider can only have one child component. I find that my React applications do end up with some extra <div> wrappers scattered throughout, just due to React limitations. It’s not a big deal, though.
Finally, we need to hook up the dev tools to our store, in store.jsx:
export default createStore(reducers, DevTools.instrument());
And that’s it! We now have a powerful Redux debugging environment built right in to our application!
State Immutability
One of the important rules of Redux is that Redux is in charge of the application state. Our code should never, ever change it.
Some people like to use ImmutableJS (or something similar) to enforce the immutability of their application state. I prefer to use plain JS objects, but I do put in a “safeguard” that monitors the application state in development builds, and will spit errors out to the console if I ever do change the state.
This is called the Redux immutable state invariant, and is a form of Redux middleware. Middleware is a powerful concept: it’s a way of hooking into actions before they actually are processed by the reducers.
The Redux immutable state invariant can be installed as such (in store.jsx):
import { applyMiddleware, compose, createStore } from 'redux';
import immutableState from 'redux-immutable-state-invariant';

const middleware = applyMiddleware(immutableState());

const storeFactory = compose(middleware, DevTools.instrument())(createStore);

export default storeFactory(reducers);
So, first we create our middleware, which in our simple app only consists of the immutable state invariant. In most real-world apps, there are usually other middlewares, such as the popular redux-thunk.
Then, we take the middleware (which is one kind of store enhancer), and combine it with our DevTools instrumentation (which is another store enhancer), and apply them to the core createStore method to create our store factory.
Finally, we invoke the store factory on our reducers, which results in our singleton store.
This is the most complex part of Redux; it can be a lot to wrap your head around at once. But you’re past the worst part now! As you develop your own application, just add helpers like this individually as you need them, and pay attention to the terminology.
Oh, and I do expect that JavaScript decorators will clean up this syntax a bit, if they ever get standardized…
Source code at this revision - Live site at this revision (ignore the “startup flicker”; that’s just due to the way it’s hosted)